Running jobs
Although you connect to the cluster through the head node, this machine isn’t designed to do any real processing work. You can run small jobs such as copying and uncompressing data on the head node and you can also use this to run editors for writing code and setting up jobs, but any significant computational work should not be run there.
The cluster runs a Workload Management System called Slurm which is a queuing system which can take in large numbers of jobs and distribute them from the head node to one of the compute nodes. They can then run in parallel and the results are returned back to the head node, from where you can collect them. The queue can manage submissions from multiple users and it can take in far more requests than can simultaneously be processed by the cluster, and will assign them to the available compute nodes in the most efficient manner possible. We would therefore strongly urge you to use the queue for your large computational jobs.
Requesting resources
One of the key aspects to the way that Slurm works is that it has to match the resources required for each submitted job to those available on the cluster. In this way it can ensure that it makes optimal use of the resources it has and processes as many jobs as possible at the same time. When you submit a job to the cluster therefore it is important that you tell the cluster, as best you can, how much computational resource your job is going to require. There are two types of resource which are important:
- The amount of memory (RAM) your job will need
- The number of CPU cores your job will use
If you don’t specify these resources then a small default will be used instead (1 core and 2GB RAM), so if your job will use a significant amount of memory or more than 1 CPU core then you must specify this when you launch it.
The options for specifying resources are the same for all of the different submission types listed below and should be appended to any of the batch submission commands (interactive sessions are not limited by resources).
To specify that your process needs to use a large amount of memory (more than 1GB) you should use the option --mem=2G and replace the 2G with whatever amount of memory you require. You should note that if your job exceeds the amount of memory you have requested then it will be killed, so make sure you ask for enough. If you don’t know how much to request then ask someone in bioinformatics for advice.
If you are running a multi-threaded application which requires more than one CPU core to complete then you should tell the scheduler how many cores it is going to use. The options to do this are --cores=8 which would specify 8 cores. Simply change the last number to the number of cores you actually require. The options below would be suitable for a job which requires 8 cores and 40GB RAM.
--cores=8 --mem=40G
Submitting to the queue
There are different ways to interact with the Slurm queue and they’re appropriate for different types of job.
Nextflow Pipelines
The easiest way to run jobs on the cluster is to use one of our pre-built analysis pipelines. To make life easier for people running batches of jobs using common bioinformatics tools we use a pipelining system called nextflow (or nf for short) which makes the process of defining and submitting jobs to the cluster much easier. Nextflow provides a series of pipelines which allow you to easily run sets of analyses, potentially involving several different programs, with a single simple command. If the job you want to run is supported by a nextflow pipeline then this is the submission method we’d recommend. If you have a lot of jobs to submit and they aren’t supported by nextflow then come and speak to someone in bioinformatics and we may be able to set up a new pipeline to allow you to run them easily.
Accessing Nextflow
Nextflow itself is just another software package installed as an environment module. To import nextflow into your current session you simply need to do:
module load nextflow
This provides access to all of the nf_ programs which launch the pipelines.
Available pipelines
All nextflow pipelines are launched using a command which starts with nf_. You can list all of the available pipelines by typing nf_ and then pressing the tab key twice.
$ nf_
nf_bismark               nf_bisulfite_WGBS        nf_qc
nf_bisulfite_PBAT        nf_bowtie2               nf_rnaseq
nf_bisulfite_RRBS        nf_chipseq               nf_trim_galore
nf_bisulfite_RRBS_clock  nf_fastqc                nf_umibam
nf_bisulfite_scBSseq     nf_fastq_screen
nf_bisulfite_scNMT       nf_hisat2
The pipelines are split into two types, some just run a single program (eg nf_bowtie2) and some which run a suite of programs to fully process a particular type of data (eg nf_rnaseq). Multi stage pipelines are what we use for the processing of data from our sequencing facility and will coordinate the running of several programs. For example this is the set of analyses performed by the nf_rnaseq pipeline.
Documentation for the different pipelines can currently be accessed here.
Running Nextflow pipelines
To run a Nextflow pipeline you simply issue a command with the following structure
nf_[name of pipeline] [files you want to process]
Often you will want to, for example, process all of the files in a particular directory so you could use something like:
nf_fastqc *fastq.gz
Nextflow will then create and submit a series of jobs to the cluster so that all of the programs in the pipeline are run for all of the files you want to process. When you first run nextflow you may find that it will initially take a while to start whilst it configures itself in your session. Most of the setup only needs to happen once and will be quicker on subsequent runs.
Nextflow options
There are a couple of other things which you might want to modify about running your nextflow pipeline.
Firstly, if your pipeline needs to map data to a reference genome then it will need to know which genome you want to use. There are a set of pre-configured genomes already available and to see what these are you just run the pipeline adding the --list_genomes option, eg:
$ nf_bowtie2 –-list_genomes

[WORKLFOW] List genomes selected
These genomes are currently available to choose from:
=====================================================
129S1_SvImJ_GRCm38
129S1_SvImJ_N-masked_GRCm38
129_Cast_GRCm38
AGPv4
ARS-UCD1.2
Apis
BALB_cJ_GRCm38
BALB_cJ_N-masked_GRCm38
BDGP5
BDGP6
BROAD05
...
Once you have found the name of the genome you want to use you can just append that to the Nextflow command:
nf_bowtie2 --genome GRCm38 [files you want to process]
In general you don’t need to specify any other parameters. The pipelines will automatically detect the type of files you’re analysing and will pair them together as appropriate. In the unlikely circumstance that your filenames are constructed in a way which makes nexflow unable to figure out which ones go together, and as long as paired sequences list next to each other alphabetically then you can force all files to be treated as single end or paired end by adding --single_end or --paired_end to your command
nf_[pipeline] --single_end [list of files]
Interactive sessions (qlogin)
An interactive session simply provides you with a login shell on a free compute node. You don’t need to specify what it is that you’re going to run and you can run as many commands within the compute session as you need to. The session will continue until you manually log out of the compute node and come back to the head node.
Interactive sessions are normally used where you want to run a single intensive application which requires user interaction. An example would be running a graphical application such as SeqMonk, where you don’t want the processing to be done on the head node so you’d start an interactive session on a compute node and launch the program from there.
You shouldn’t use interactive sessions to run multiple large compute jobs, it’s much better to use the other submission options for these. Firstly this is because jobs started within an interactive session can’t be monitored by the main Slurm queue so may end up clashing with other running jobs. Also, you can only start jobs on the physical server you are assigned in an interactive session, whereas the main queue can distribute your jobs over all the physical servers in the cluster where they will complete much more quickly.
To start an interactive session simply type qlogin on the head node.
$ qlogin
 [andrewss@compute-1-0 ~]$
An interactive session will get 20GB of memory by default, the session will get killed if you go over this limit. To start an interactive session with more memory, you can use the --mem options.
$ qlogin --mem=32GB
 [andrewss@compute-1-0 ~]$
Non-interactive batch jobs
The preferred way to submit any large batch jobs is through the use of the ssub command. The ssub command should be used for jobs which can be submitted and then left to run with no further user interaction. Ssub itself is a software module, but it's loaded by default so it should be in your shell as soon as you connect to the cluster.
One loaded you can see the full set of options for ssub by running:
ssub --help
In its simplest form you can just take any command which you’d run on the head node and put ssub before it and it will be submitted to the queue, so instead of:
[andrewss@capstone ~]$ fastqc --version
FastQC v0.11.8
You’d run:
[andrewss@capstone ~]$ ssub fastqc --version
Submitted batch job 12210

[andrewss@capstone ~]$ cat slurm-12210.out
FastQC v0.11.8
In this simple version the output for your job goes into a file called slurm-[job_id].out (so slurm-12210.out in this case). The job will get 1 cpu core and 2GB RAM to work with.
A slightly more complex job submission would look like
ssub -o qc.log --mem=10G --cores=5 --email fastqc *fq.gz
In this we: • Specify the resources we need using --mem for memory and --cores for the number of CPU cores we want • Specify the name of the file we want to contain our output (qc.log) • Use the --email flag to get slurm to mail us when the job starts and finishes
You can use as many or as few of these features as you like depending on your requirements.
If you want to do more complicated things, you will have to directly use the sbatch command, see 'man sbatch' for more details
Running programs via the web interface
If you would like to run programs such as RStudio, JupyterLab, FileBrowser or Ollama on a compute node then rather than going via an ssh connection and using qlogin you can also access these environments via the cluster web interface.
If you log into the web interface at https://capstone.babraham.ac.uk and then click on the programs tab you will see options to launch and then connect to either an Rstudio Server or Jupyter Lab session.
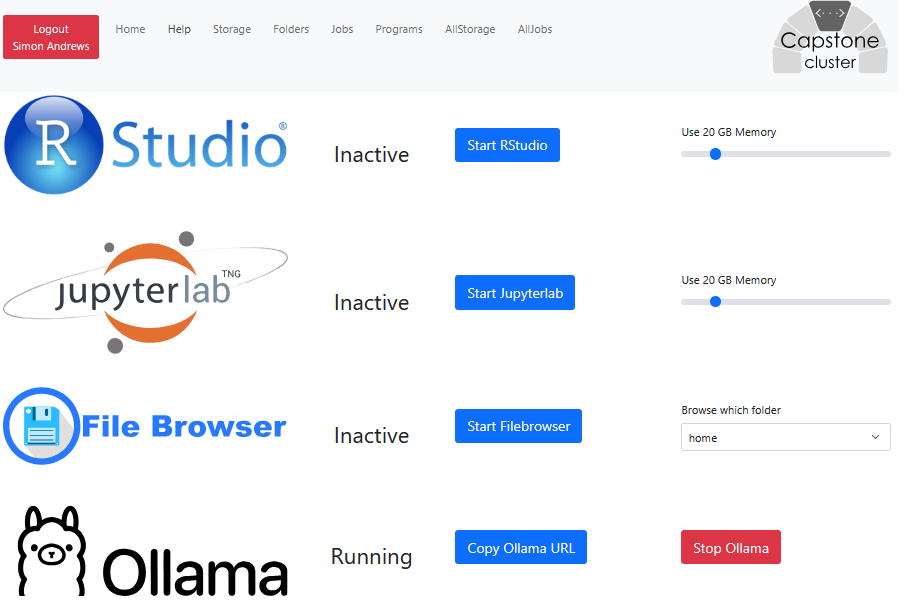
These sessions will run on an interactive compute node, but you can access them directly from your browser.
Running Ollama LLMs
From the Programs menu you can start an Ollama server running a large language model. Unlike the other programs on the list this doesn't have a direct web interface but provides an API to which you can then connect other programs. When you start ollama you will have a button which will copy the API address to your clipboard.
Once you have the API the simplest thing to do is start a chat web interface to use it. The simplest of these is Page Assist which is a broswer extension to talk to LLMs. If you install the extension then you can start it and then paste the URL into the box on the front page. You'll then likely need to do shift+refresh on your page to get the full details to load, you can then select a model from the drop down at the top, and then put prompts into the chat box at the bottom.